
When mulling over what topic I would choose for my second Photoshop Elements tutorial as an Ambassador, I was torn between something with a "Wow!" aesthetic factor and something at little more subtle, yet totally life-changing. Bloggers tend to be very visual people and I wanted to deliver on that but when I thought about how much time and energy Automate/Batch has saved me, I knew it was the winner. It may not be the most visually captivating tool in Photoshop Elements, but I promise it'll leave you saying "Wow!" for a completely different reason!
If you take outfit photos, product shots, or even photos on vacation, you know how easily hundreds of photos pile up. You make sure to shoot at a high resolution (or even in Camera RAW) so you can print them at a later date, but those huge file sizes aren't exactly browser/internet friendly. Maybe you have so many photos flying from your camera to your computer at one time that you're afraid the different batches will get mixed up and you'll be left with a giant mess on your hands. Enter Batch Edit!
Did you know you can resize, edit, rename, watermark and organize an entire set of photos (tens! hundreds! tons!) with just one click?! Okay, so maybe one click is a little exaggerative, but just check this out below. Seriously, it's so insanely easy and you'll be thanking Adobe later!

The first thing you want to do is put all of the photos you want organized or edited together in a single folder. The raw, straight-from-camera versions are fine. Just drag and drop them into a new folder all their own and name it whatever you wish. All of my images are titled something like "DSC_0101" when I copy them over. Batch Edit will allow you to name them all the same thing so don't stress!
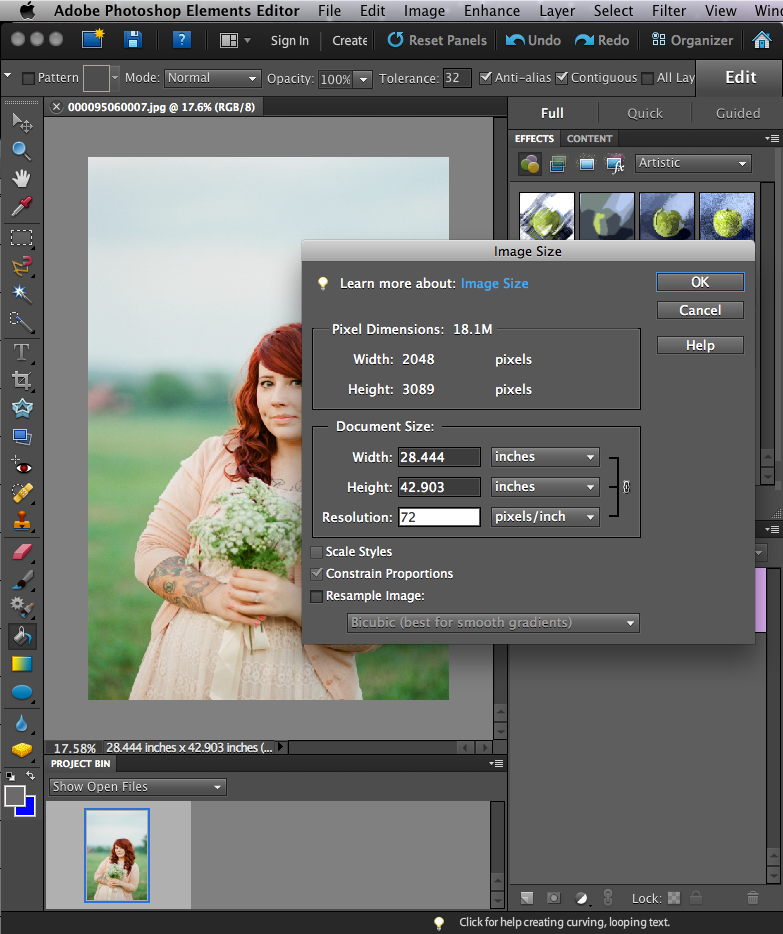
This next step is optional, but it'll help give you a first-hand account on how your document's dimensions work. Once you have your images, whether 5 or 500, in one folder, open one of them in Photoshop Elements and click Image --> Resize --> Image Size to get an idea of how large your photos are. Below is a screenshot of my original file. It's currently 18.1M which is insanely too large to be putting online. At this size my photo would take an eternity to load and could potentially crash a reader's browser! The main things to take note of are: Pixel dimension, document size and resolution.

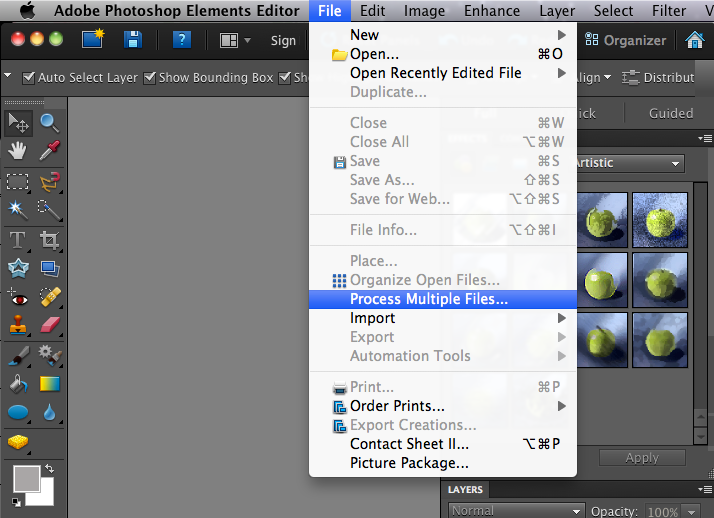
Now to get started on the real batch editing! After loading all of your images into one folder, click File --> Process Multiple Files... to begin the process. A charcoal prompt box will appear. Don't be intimidated by the buttons and choices! I've detailed what they all do below! You do not have to do all of these at once! Or at all! I'm only showing you the screenshots to help explain what is possible in Elements! Don't let all of the boxes scare you! I promise it's a simple 2-click, 30 second task!
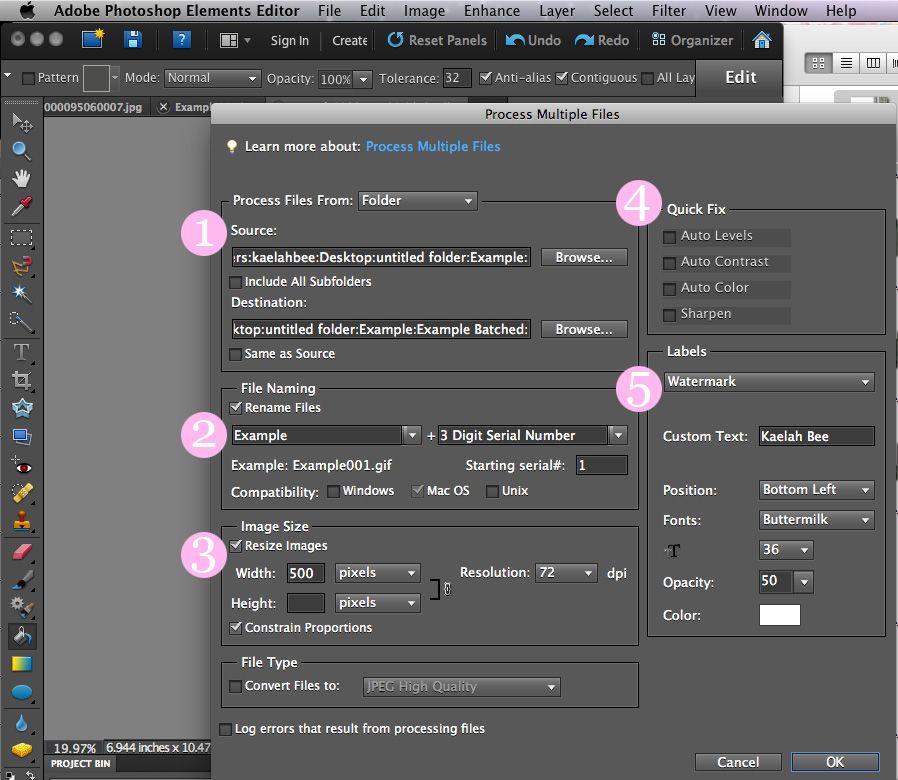
A quick and generalized run-down of the Batch prompt:
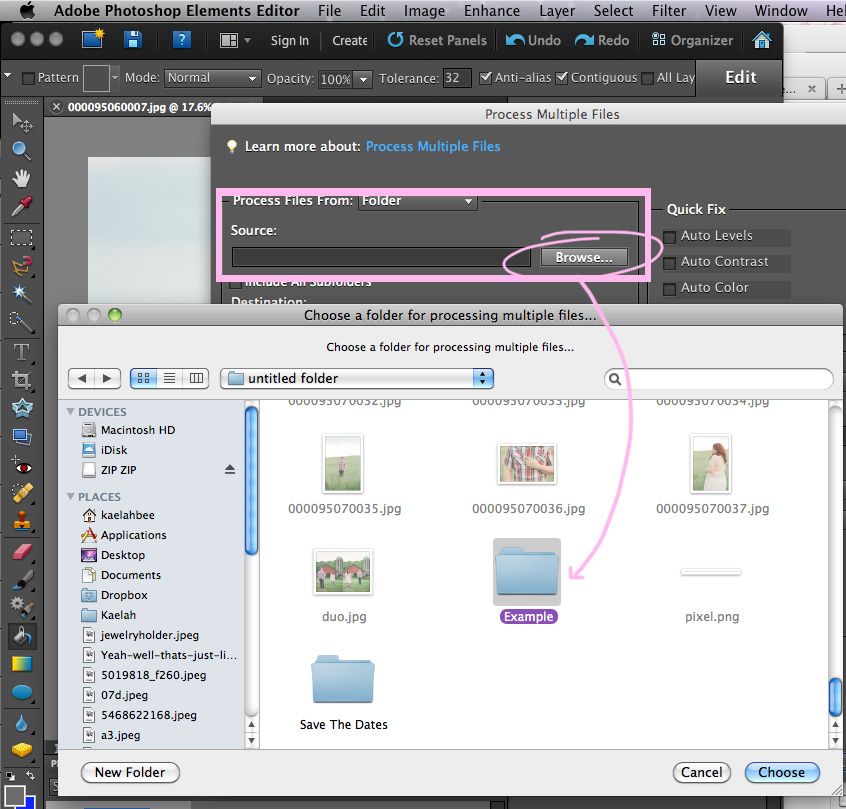
1. Source and Destination folders: Choose "Browse" to find the folder with all of the original photos you accumulated. If you want to keep them super organized and separated, create an additional folder (empty!) to save the new files into. This helps keep your original image intact in case you want the hi-res version later!
2. File Naming: This comes in so handy if you like to organize your files by name. I label each outfit under a new name, but as a set. You can also name them according to place, date, or product depending on what it is you're working on. (Pro-tip: The file name of your image actually helps Google catalog them in the search engine! Try naming your photos with something specific and this will in-turn help with your page rank and traffic!)
3. Image Size: This is a big one no matter who you are or what you're using your photos for! File size can bog down your blog's loading time and can even crash a reader's browser! Be kind and make sure to properly size your images so there's no lag. The content area of my blog fits 500 pixel images so I've deemed that a great size for my photos. Notice that I leave the height box blank and click "Constrain Proportions" so that Elements sizes it for me. I also make sure the resolution is 72 dpi.
4. Quick Fix: This is a great way to give your photos some extra "oomph!" without even trying. If all of your photos were taken in low or weird light, or you just want to beef up the contrast some, click some of these boxes so Elements can quickly make those adjustments for you! Generally speaking Elements does a really great job of determining what your photos need and how to quickly fix them up.
5. Labels: If you're a blogger, photographer, or indie biz owner, the watermark feature could be the difference thousands upon thousands of hits to your site or someone stealing your photo and claiming it as their own. We live in a time where intellectual property theft is at an all time high and it's super easy to do. Protect your photos by doing a watermark with your name and/or site URL on the photo. That way if it all of a sudden goes viral on Tumblr or Pinterest, you'll still get credit no matter what!
Now that you know what everything does, browse your computer's harddrive, locate the source folder, and determine where you want the edited files to end up. It's also time to decide how large you what your images to be, and if you'd like the edited or watermarked. Once you've made all of those decisions just hit "Ok"...

That's that! Elements will now open, batch edit, and close each and every one of your images from the source folder. Give your computer some time to do this. Busy yourself with another task while it works. It can take as little as a few seconds or several minutes depending on how many images you decided to edit.
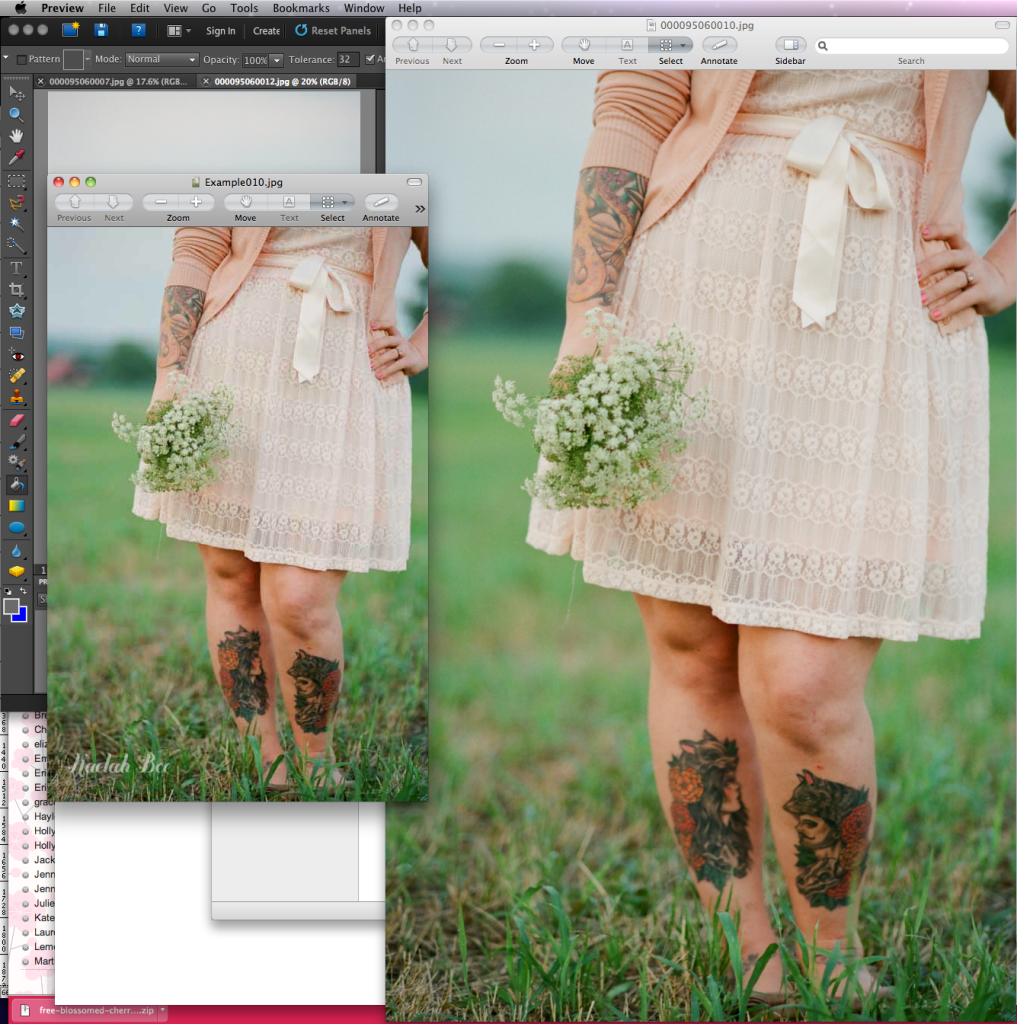

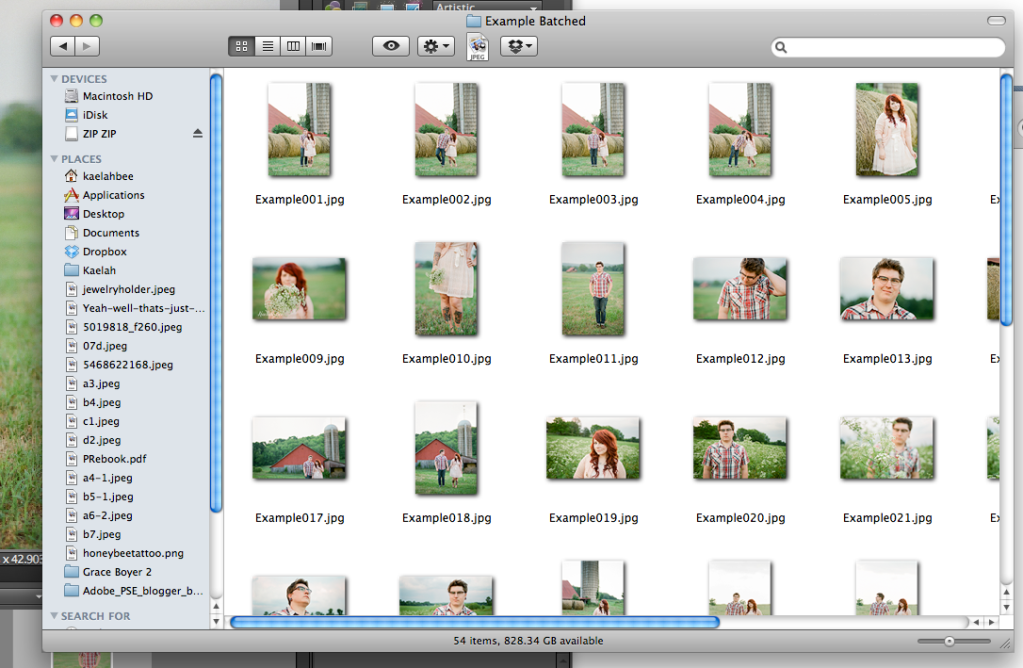

Once Elements has completed your batch edit, open your Destination folder and check out the files all in a row! I named mine "Example" for example's sake (so creative!) and you can see them all in order. Two images up you can see the edited file next to the original. The edited file is much smaller and dons a little watermark with my name. It may not look like a big deal now, but your readers (and the internet in general!) will thank you for the small sized images and quicker loading time. At the end of the day it's your readers' experience that truly matters! Quick loading images and zero lag will keep them coming back day after day!
As a blogger, photographer, and online shop owner, the Batch tool is life-saving. If certain photos need more in-depth tuning, I can open them up and give them more individualized attention. But for the most part all they need is a punch of contrast, a smaller package size, a sequenced name for easy filing and sometimes a watermark for security. It's pretty amazing that one little tool can do all of that for me.
Are you a batch-tool user? Think it could help you in your online life? Let me know! I hope my tutorial was informative and easy to follow.
As always, you can follow along in the Photoshop Elements Ambassador program by subscribing on Facebook, Twitter, YouTube and Pinterest!


Wow can you do this with Photoshop?
ReplyDeleteYep! It's under File --> Automate --> Batch. In Photoshop you can also record (or load) actions and do them in Batch mode. You can apply more extensive watermarks, layers, masks, etc. The Batch tool is a wonderful thing whether you're in Elements or Photoshop!
DeleteOMG this is life changing!!!!
DeleteCan you also load actions on Photoshop Elements?
Thanks so much!!
Alice. xxx
Hi Alice! I can't reply directly to your comment in the thread but I will copy + paste my answer to the same question from below! Unfortunately it does not seem that Elements allows extended actions like the ones you might buy/download. I think Elements (at least current versions) limits you to size, auto corrects and watermarks. Perhaps they'll consider adding this function to future versions!
DeleteThis technique is amazing! Thank you so much for opening my world to another dimension of PSE!!
DeleteCan I do this on Macromedia Fireworks too?
DeleteHow about Auto Straightening photos?
DeleteI have been using Photoshop Elements for over a year now and I still learn new things everyday! I love this series because it's like a refresher for the "I learned this myself via google, I hope I'm doing it right" voice inside me!
ReplyDeletexoxohannah
www.signedxoxohannah.com
Holy cow that was life changing. I just did a test folder and it was amazing! THANKS for the tutorial!
ReplyDeleteGlad you were able to test it out first hand! It really will alter your efficiency (for the best!). It's an amazing tool!
DeleteOh my goodness that looks like so much confusing work! I'm sure you're used to it by now, but wow. :/
ReplyDeleteIt might *look* confusing but it's actually the simplest thing in the entire world. It's literally 2 clicks. All of that up there is just me explaining what everything does as an option. Try doing it as your read it. You'll be amazed at how simple it is. It takes about 30 seconds from start to complete.
Deleteokay this is LIFE CHANGING. I had no idea I could do this in elements. AWESOME!!! Thanks for sharing!!!
ReplyDeleteHope you find it super useful!
DeleteWow, that's so awesome!
ReplyDeleteOh my gosh this is GREAT! I hate to admit this but a lot of times I put off doing my blog posts because I don't have time to edit my photos, and now I do! Thanks for the tips, the tutorial was so easy to follow.
ReplyDeleteIt's amazing how much can into editing photos, and the time saved is such a stress relief! So glad you found it easy to follow!
DeleteI batch edit sometimes and it's such a huge time saver! I should really do it more often actually. I need to bookmark this one for sure :) Thanks so much!
ReplyDeleteIs there an undo for batch edit? I used it on some pics that uploaded at 75 instead of 300. I entered the wrong numbers. Anyway to fix it?
ReplyDeleteIf you designated a new folder to save them in, you should still have your original files in the original folder you created. You can just delete the batch folder with the edited ones and re-do it at 300 dpi.
DeleteIf you click "Same as Source" in the Destination prompt and you don't rename them, your original files will be overwritten. It's very important to create a new folder and/or rename the batched files so you don't lose your previous work!
Woooowwwwww. Amazing and SO easy. Thanks, Kaelah!
ReplyDeleteOkay seriously, this IS life-changing!! I had no idea this was an option in Elements. Yup, mind blown! Is there a way to apply an action to all the photos at the same time too?
ReplyDeleteUnfortunately it does not seem that Elements allows extended actions like the ones you might buy/download. I think Elements (at least current versions) limits you to size, auto corrects and watermarks. Perhaps they'll consider adding this function to future versions!
DeleteThat would be cool. :) Thanks for answering my question!
DeleteYay! I am so glad you are doing these posts. My lovely hubby bought me Photoshop Pro and I have no clue how to use it! So now I will know a little more.
ReplyDeletexoxo
Gracie B
http://betwixxt.blogspot.com/
This comment has been removed by the author.
ReplyDeleteSeriously saving up for Elements now, you've convinced me! This is so perfect for people that are too broke for photoshop/are casual bloggers that have no need for it but still want good editing software.
ReplyDeleteElements really does make a huge difference in the visual elements bloggers use, and it's *so* much cheaper, and less intimidating even, than the traditional Photoshop. I think they're both great programs but see no reason to spend a ton of money if Elements does what you need it to!
DeleteThough I did not read the entire post today like I usually do, I did however scan over the post. I have always had this problem with editing more than hundreds, even thousands of pictures (I'm at 4000+ of editing at the moment) and never any time really to do so.
ReplyDeleteAlthough I do not have Adobe, I do have GIMP, an alternative to Windows editing programs simply put on Linux, one of the most convenient operating systems I've ever had. So now, thanks to this post, I know now about batch editing through GIMP (after careful research about installing the appropriate plugins), which will save me a BUNCH of time and less of a hassle when getting things done (blog, putting images on Facebook, updating my shop, etc).
THANKS SO MUCH!
This is amazing! I'm convinced that I want this, I just hope it's not too expensive!
ReplyDeleteXoxo Sarah
theantiquepearl.blogspot.com
OHHHH MYYYY gosh. Thank you, thank you, thank you for posting this! I have been wracking my brain trying to figure out an easier way to resize, fix, and/or upload my pictures to my blog. I've been loading the originals to photobucket and using the html code to post on my blog. A little time consuming so I cannot wait to try this out! It looks so easy!
ReplyDeleteThank you again! Totally made my night! :)
Ok this is awesome and I am totally bookmarking this. Thank you!
ReplyDeleteAdobe Dreamweaver is a web design and development application that provides a visual WYSIWYG editor (colloquially referred to as the Design view) and a code editor with standard features such as syntax highlighting, code completion, and code collapsing as well as more sophisticated features such as real-time syntax checking and code introspection for generating code hints to assist the user in writing code.dreamweaver training london
ReplyDeleteThis is awesome! thank you!
ReplyDeletex
thanks!
ReplyDeleteYou have literally just sold me on photoshop. Something my university magazine design teacher failed to do!
ReplyDeleteMy hubby brought me Elements for chrissy and have had a love hate relationship every since! We now have a love/love relationship thanks to you.
ReplyDeleteTHANK YOU Kaelah you make it so simple and easy to use.
Kate
I also find the photo editing process a chore and my photos are so unorganized. I will start doing this right away and I will put my old photos on my fall/winter to do list. It's exasperating looking for photos when I want to do a post and everything is so Willy nilly. It takes the joy out if it for me. Thank you so much for sharing.
ReplyDeleteVintagehoneybee.blogspot.com
This is AMAZING. WOW. Have to play around with the next batch of photos I take. I have actual Photoshop and tried your File > Automate > Batch trick, and it worked totally well! As everyone before me has said, LIFE-CHANGING. OMG. Thank you so, so much for making editing my photos easier!
ReplyDelete- Samantha
http://samlovesmakeup.wordpress.com
I've been using elements for years but didn't know about batch editing until now. Thanks for the post!
ReplyDeleteThank you thank you thank you! I've been using Elements for like - EVER - and just didn't know to do this. You just made me life so much simpler. You rock.
ReplyDeleteCan I ask you, I am new at using Adobe and I wonder which one you would recommend as a blogger? Elements 11 OR Lightroom 4? Can You just buy and use them separetly or do I need tp buy Photoshop first? I am really new at this, I have only used Photoscape previously but now I have bought a Mac and I cannot use my Photoscape any more....
ReplyDeleteMany thanks in advance!
Shopaholic
Thanks for your question :)
DeleteLightroom is really just a tool for photographers + photo editing. If you'd like to create any graphics for your layout or blog, I'd recommend Photoshop in some form. You don't need to buy Photoshop in it's full form to use Lightroom or Elements. I think Elements would be the best bet for you right now! :)
Best tutorial ever! Thank you so much - yours was the first one I clicked on and was so clear and helpful. I get so tired of lame tutorials. :/
ReplyDeleteSuch a great blog! Thank youuuuuu
LOVE this, only I really need to apply actions with it! lol! What do you think the minimum upgrade to my Elements 10 would be in order to automate actions in large batches?
ReplyDeleteLOVE this, but I really need to apply actions with this technique. lol! What do you think the minimum upgrade to my Elements 10 would be in order to be able to automate actions in batches?
ReplyDeleteThis was great. What a time saver!
ReplyDeleteHoly Moly, that was easy! Thank you so much. This will be such a big help as I create my third comic book!
ReplyDeleteDear Kaelah, you are a total champ. could not figure out how to do this and I have a 10 room bricks and mortar shop and we have outgrown our current website with 1500 products listed. I have a monster job ahead of me. Thanks a million, Dionne
ReplyDeleteKaelah, you are a total champ, I have a massive job ahead of me with a 10 room bricks and mortar needlecraft shop to load because we have outgrown our current shopping cart technology. You have saved me so much time.
ReplyDeleteYou just changed my life with this post. Thank you!!!
ReplyDeleteI just have a quick question- if I don't want to "auto" edit my photos, when should I edit them myself? Before uploading them into the folder to start the batch edit process or after? I'm just afraid of losing image quality.
ReplyDeleteThanks- and this was SUPER helpful. Just wondering about the last thing.
Thanks!
Yes you can edit the photos manually before putting them in a folder together. Just don't edit the image or canvas size before you batch automate the folder. You shouldn't experience any loss in quality if you only edit things like brightness, contrast, etc. However if you crop any of your images before batch resizing them, then you may run into some issues with quality. It's best to be sure all dimensions are the same on the images (with respect to portrait vs landscape orientation) that way you can insure that the batch edited files will hold the right proportion after they're automated. Hope that makes sense!
DeleteI just tried this and when I select the source folder PSE tells me the source folder is empty. But it's not. My images are in there. All I wanted to do was try out the watermark option. So all the images are already edited for size, sharpness, lighting etc. I don't understand why it's telling me the folder is empty :-/ Any ideas?
ReplyDeletehi,look at it your original file name what you browsie.it saves in same file.thanks
Deletethanks.it was really great help.
ReplyDeleteThis made my day! Thank you!!
ReplyDeleteThis just made my day! Thank you so much!
ReplyDeleteThank you ever so much for this 'life-changing' & clearly presented tutorial! I just did a trial and am happy with the results. Next I will be playing with the different functions to fine tune the results. I guess I can ask for the photos to be converted into PSD to be able to make individual adjustments, if needed (e.g. too large/small watermark). I will certainly start using the batch edit function regularly now and will be able to share my holiday photos with family & friends sooner after my holidays!
ReplyDeleteA real eye opener.
ReplyDeleteThis would be great if I could apply my own actions...sigh...
ReplyDeleteusually when i do the auto fixes it doesnt look that great :/ is there a way to fix this
ReplyDeleteFantastic blog you got here,I enjoyed reading some of your posts.
ReplyDeleteclipping
How can you straighten a # of photos as a batch?
ReplyDeleteHi, struggling with how to start the batch edit! I have a folder in the organise section. Id like to batch watermark it all. If i open editor without selecting a photo the process multiple files is not an option? But by selecting one pic its not an option either! Id really appreciate some help please, i do believe its a very blond moment im having! Ta
ReplyDeleteHi i could really use some help please! Im clearly missing something. I have a folder i would like to watermark. Its the starting point in editor im struggling with. Process multiple files is not an option for me? My folder is in the organise section. Do i then open a photo up? But that then doesnt offer process multiple files! Im clearly having a blond moment! Cheers for any assistance....
ReplyDeletePhotoshop Express consists of several sets. The primary function provides framing, alignment, rotation and reflection. Working with color involves exposure level adjustment, saturation, contrast, tint filters and black & white. In a separate set there are isolated sketch, soft focus, and sharpen. For connoisseurs of frames it contains a set of edge effects. Such presets cant be compared with http://besthdrsoftwaremac.com/ commercial products
ReplyDeleteNice post. I learned new things. Thanks for sharing this post.
ReplyDeletephoto editing services
I seriously love similar posts, with a detailed description with pictures. Thank you very much! I have a low skill on Photoshop. I used this https://macphun.com/. Now I will do something in Photoshop, to develop my skill. I look forward to new lessons and tips. Good luck.
ReplyDeleteI came onto your blog while focusing just slightly submits. Nice strategy for next, I will be bookmarking at once seize your complete rises modern resume template
ReplyDeleteWow! I have some pdf files of scanned old pulp magazines. They have very dark backgrounds. So I exported each page to a separate image file, used Elements to fix the contrast and sharpen the text, then combined them back into a new pdf that was much easier to read and print. I did two issues by processing each page, one by one. I knew there had to be a way to do the same process to all at once, but I could not find it myself. Off to Google to ask how, and your article came up. It works! I can do the next issue (about 132 pages each) in just a few minutes, rather in almost two hours. Thank you!
ReplyDeleteHi,
ReplyDeleteWhen I load all my photos to be edited the Process Multiple Files item is not highlighted therefore I cannot select it. Any help??
Billy
I always forget how to batch edit, when I stop blogging for a while. This is the most simple tutorial I have used. Thank you!! Now I can get back to blogging with out spending hours and hours working on my photos.
ReplyDeleteHow can I add a border in Photoshop Elements in bulk? It amazes me that Photoshop Elements and Lightroom both don't give simple options to do this.
ReplyDeleteIs there a way to stop it after its started?
ReplyDeleteThis is the best and easiest explanation I've read on how to add Wateremarks to Photographs. Many thanks.
ReplyDeleteThank you a bunch for sharing this with all
ReplyDeleteof us you really recognize what you are talking about!
Bookmarked. Please additionally talk over with my site =).
We could have a hyperlink exchange contract among
us